Mrs. Magic!

Mrs. Magic!
Cakes made to make your mouth order!

Tuesday, May 5, 2020

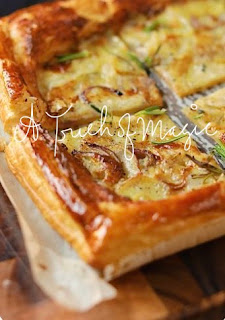
POTATO AND BLUE CHEESE SAVOURY TART

What a way to start the day !

Who doesn't  love puff pastry for breakfast.. or lunch... or dinner! 

I love the simplicity  of this recipe.  Gorgonzola cheese is very similar to Stilton, it has such a delicious sharp bite but yet creamy aftertaste and works beautifully when matched with creamy mascarpone cheese . Match made in heaven if you ask me.


POTATO & BLUE CHEESE SAVOURY TART 

INGREDIENTS
320g Jus-Rol Block of pastry (or whatever shop brand you prefer)
150g Gorgonzola Piquante cheese
60g Mascarpone cheese
3 Tablespoons cream (50ml) 
2 large potatoes (thinly sliced, I used red rooster)
2 Tablespoons Olive oil (for the potato)
1 red onion (thinly sliced)
Black pepper
Salt 
1 egg yolk (egg wash) 
1 tablespoon milk (egg wash)
Fresh Rosemary (Optional)

METHOD
Preheat your oven to 220C 
Take your pastry out of the fridge 20minutes before you need to use it (easier to unroll)
Unroll you pastry and place on a greased tray lined with baking parchment
Chill pastry while you slice your potatoes and onions no point in leaving it hanging around while you chop!
Toss the sliced potatoes with the oil and mix well, the oil  helps cook the potatoes in the oven.

Using a knife score about an inch away from the edge to create a border all the way around your puff pastry.
With a fork prick the base within the rectangle but not the border. You want the border to rise.
DO NOT PRICK THE BORDER OR YOUR PASTRY WILL DEFLATE WHILE BAKING.
You want the walls of the puff pastry to rise while your potato and cheese filling bubbles away contained within the border.
Next mix your cream and mascarpone along with most of the gorgonzola to a paté and smear the base of your pastry tart ( within the walls of the border ) 
Sprinkle the rest of the gorgonzola on the cheese base, scatter the onion over the cheese mixture and layer thinly sliced potato on top of the onion .
At this stage you could also add a touch of chopped Rosemary to the mix for another Flaaaaaaavour ….
Season with a little sea salt and ground black pepper
Place in your oven for 25 minutes until golden and bubbling at 220C
Remove and cool on a rack before slicing and serving with a gorgeous salad and cold glass of SOMETHING!

KA-BOOM…. HERE COMES THE WEEKEND!!! 

Friday, April 24, 2020

TOOTY FRUITY TRAY-BAKE

TOOTY FRUITY BREAKFAST TRAY-BAKE

Thursdays are made for Tray-bakes and this one is a keeper, baked in a swiss-roll tin
for easy cutting perfect for kids snacks throughout the week,  if they last that long!

Full of fruity goodness along with porridge oats makes them a healthy alternative to sugary snacks,  you can be sure after eating one you will be fuller for longer throughout the day .

As a treat serve them up after dinner with a scoop of vanilla ice-cream and some seasonal fruit.


Follow me on YouTube for magic mahem...

https://www.youtube.com/watch?v=ef6EIjiNUpY


 TOOTY FRUITY TRAYBAKE
INGREDIENTS
180ml Milk or Buttermilk
180ml Sunflower oil
2 large eggs 
2 teaspoon vanilla extract
300g Self-Raising Flour
140g Caster sugar
2 teaspoon baking powder
100g Porridge oats
200g Frozen berries** or fresh if seasonal (See Tip**) 


METHOD
  • First pre-heat your oven to 180C\
  • Line and grease your swiss roll tray or  13” x 9” 
  • Measure out all your ingredients so you have everything at hand 
  • Mix your milk, sunflower oil, egg and vanilla extract in a jug 
  • In a separate bowl add your flour, baking powder, oats 
  • Toss the berries into the flour mix before you add the sugar. 
  • Add your wet ingredients to dry ingredients and gently stir, blend but
    don’t over mix as you want to be as light as fairy wings! 
  • Pour the batter into a greased and lined swissroll tin about 13” x 9” 
  • Sprinkle a little pinch of oats on top for the crunch before they bake. 
  • Bake in your preheated oven for about 30minutes 
  • Remove from tray and cool on baking rack for 10 minutes 
  • Leave for at least 15 minutes to cool as the fruit is very hot and will burn
    your mouth!!!! You have to be patient, they’re worth the wait.
  • Lash on your glacé icing either with a palette knife or pipe in a zig zag fashion using a piping bag 
ICING GLAZE
200g Icing sugar 
2 -Tablespoons of water 
(Add water to icing and stir for desired thickness)


  • TIP• Toss the frozen berries in flour before you mix in the rest of the ingredients so they won’t sink to the bottom


Wednesday, April 22, 2020

2 MINUTE MAGIC NAAN BREAD

This is ridiculous,  how could something so simple  taste so good.

If you're ready to take on some madness follow the clip for visual instructions...

https://www.facebook.com/atouchofmagiccork/videos/1525204564305549/

The clever use of natural yoghurt helps make these naan bread so soft and pillowy and soooooo... easy to make.

Kids have great fun deciding on what flavours to include, chopped Rosemary, Thyme, Tarragon whatever flavour tickles your fancy or even make them sweet with the addition of Cinnamon .

Keep it simple... don't go mental...

 INGREDIENTS
100g Self-raising flour
¼ teaspoon salt
100g natural Yoghurt 
½ teaspoon dried Rosemary or Thyme (optional)

METHOD
  • Put all your dry ingredients into a mixing bowl, youR flour salt & herbs if using.
  • Now add your yoghurt and stir until well combined.
  • Knead into a little flour ball and cover for 10 or 15 minutes to settle
  • Cut into four and finely roll our each dough piece into a flattened Naan
  • Place on a pre-heated frying pan and bake until you see little bubble air pockets forming.
  • Flip over and cook for another minute.
  • I like to have a pot of warm water simmering away with a bowl and plate ready to place my naan bread in to keep warm before I serve.
  • I don’t microwave as you lose the soft pillowy texture. 
  • Brush with some melted flavoured butter of choice and chopped parsley

KA-BOOM! Done

TIP
Sauté an onion or clove of garlic( or both) until caramelised , cool and add to dry flour mix
Or… 
Add a little chilli flakes to spice up the Naan
Add some sweetness by replacing the salt with ½  teaspoon of caster sugar and adding ¼ teaspoon cinnamon , serve with natural yoghurt and some fresh berries with a drizzle honey
Use as a wrap and fill with your favourite lunch fillings
Crack an egg on top and serve with bacon for breakfast ……

Na -Na -Na -Na- Na- Na- Na -Na……..NAAN BREAD

If you'd like you can now SUBSCRIBE to my YouTube Channel for my delicious recipes and marvellous mayhem ...


Tuesday, April 21, 2020

Waffly Versatile Wonderful Wholesome Wholewheat Waffles!

Follow my journey as I bake my way through the Corona Pandemic. What started off as a one off baking recipe has now developed into a daily Facebook routine , 10am every morning since the 15th of March I bounce into my kitchen and Facebook LIVE every day.

https://www.facebook.com/atouchofmagiccork/videos/246470333389941/

I'm sharing some wonderful Irish traditional recipes that I grew up on and loved. Let's have a generation born again to bake, let's whisk it for a biscuit or ....a waffle !!

These delicious fluffy wholewheat waffles are just made for breakfasts! Every mouthful just screams goodness.

Recipe is as easy as 1, 2, 3.... perfect for kids to make at home , these are also great served with a scoop of ice-cream for an after dinner treat.

INGREDIENTS - 
WHOLEWHEAT WAFFLES
(Serves 8 or one hungry teenager)
260g Wholewheat flour
3 Teaspoons Baking powder
½ Teaspoon cinnamon
2 Large Eggs
100ml sunflower Oil
2 Tablespoons Brown sugar
420ml Buttermilk
1 Teaspoon vanilla extract


METHOD
  • Pre-heat your waffle iron , once hot you must slather in melted butter or the waffle will stick, years of experience having this Russell Hobbs Waffle machine!! **
  • Mix all the wet ingredients together in a jug to make it easier to pour
  • Mix all the dry ingredients together
  • Now combine the wet into the dry ingredients and blend until completely combined
  • You will have a sloppy batter perfect for your waffle iron or a greased frying pan.
  • It takes 6 minutes for a soft waffle or 8 minutes for an little extra crunch (I love the extra two
    minutes for a crispy shell)
  • Dust with icing sugar or top with your favourite yoghurt and fresh fruit with a drizzle of honey
    and sprinkle of nuts.
  • This batter is very versatile, you can add dried or fresh herbs to the batter to make them
    savoury, add chopped pieces of cooked bacon ,the list is endless! Get creative.. the are WAFFLY VERSATILE
    ** This is not a paid or promotional post , it is my honest opinion of a great product that has got a hammering over the years with my family of six and still smiling! ... the machine , just like me , waffles on ....


Tuesday, February 21, 2012

SUB..LIME COCONUT AND GINGER CAKE!!


Where has the year gone!! I promised the world a blog then promised myself at least one entry a week! Who am I kidding! Four kids glued to hip, pot stirring, phone ringing, emailing juggling, pot scrubbing and decorating cakes! Opps don't forget teaching the art of sugarcraft to all those who listen! Will feed them well and they will follow!!! Yummy Coconut, lime and ginger cake!!

Wonderful students who make my life a breeze and a joy to be around. Kettle on and .......


150g Unsalted butter
170 g Caster Sugar
2 teaspoons grated lime zest
2 eggs lightly beaten (room temp)
55g finely chopped glace ginger
215g Self-Raising Flour
45g Dessicated coconut
185 ml milk (room temp)

Preheat oven to 180 C. Grease and line a 2lb loaf tin .

Beat the butter, sugar and lime zest in a bowl using electric beaters until pale and creamy (takes bout about 1o minutes !!!)
Add the egg gradually, beating well after each addition, then add the ginger. Fold in the sifted flour and the coconut, alternately with the milk.

Spoon mixture into tin and smooth the surface. Bake for about 50 minutes , or until a skewer inserted into the centre of the cake comes out clean.

Leave in tin for 5 mins then turn onto a wire rack to cool. Drizzle with some glace icing made up with the juice of one of the limes and drizzle on top and gobble, gobble, gobble! xx

Saturday, October 8, 2011

ONE OF YOUR FIVE A DAY IN JUST ONE BITE!


Who can resist the allure of a perfectly pink macaroon, a gleaming jar of marmalade, or the sweet gritty promise of a square of fudge!! Love the local markets! We all still find it pretty much impossible to walk past a local market without being tempted by the home-made offerings on display so why don't we bake it ourselves! The hassle, the mess, the ingredients, the time but the fun, the smell, the pride, the taste, the flavour are all elements we can't ignore.

Easy fun recipes whatever you decide to bake rest assured that the rewards for creating it will be far greater than the effort you put into making it! Support and help local markets if you're not going to bake it or make it yourself!


EAZY PEAZY - TOFFEE APPLES
One of your five a day in just one bite!

12 small red or green apples
12 x 8" long wooden sticks (available in craft shops!)
880g caster sugar
250ml water
80ml Glucose Syrup (Available in Brennans www.brenco.ie)
(Colour droplets red or green to enhance / Optional!)

1. Line two baking trays with baking paper

2. Wash apples under cold water, stand on a wire rack until dry, do not be tempted to rub with cloth!!

3. Push a wooden stick three-quarters of the the way through each apple from stem end

4. Combine sugar, water, glucose & colouring (if using!!) in large , saucepan stir over a low heat until sugar dissolves. Bring to the boil, boil uncovered for about 10mins or until it reaches 145C/300C on sugar thermometer, or when cracks when dropped into a cup of cold water.

5. Remove from the heat, allow bubbles to subside, tilt pan slightly to one side and carefully dip an apple in toffee, twist slowly to coat.... if dipped too quickly you'll get air bubbles!

6. Twirl apples around a few times over pan to drain excess then place on prepared tray and leave to set!


Monday, July 18, 2011

WASTE NOT WANT NOT!

ONCE YOU POP!........

Get ready to experience cake as you've never seen it before! Once you pop you can't stop... cake pops that is! Cake pops, cupcake pops, cake balls and bites call it what you will, they all have something in common... crumbled cake mixture, cake filling & covered in chocolate or a special candy coating.

It's great for getting rid of those excess cake crumbs!! Forget about cake truffles say hello to cake pops!


Crumble your cake and mix in flavoured buttercream or ganache until throughly combined, sticky enough to form balls . After rolling the cake balls by hand place on a wax-paper covered baking sheet. Chill for several hours to settle, you want the cake balls to be firm but not frozen.

At the moment I'm useless for quantities because its hit and miss, it really is a matter of using up what cake crumbs and cake filling you have left over and making the most of your unwanted scraps! You can dip in chocolate milk or white and get creative!

I can't take credit for this genius idea! This is all thanks to www.bakerella.com visit her web for more inspiring ideas or better still buy her book!